
Construction recipe (step by step instructions)
First, get hold of the material you need to begin. You will need more along the way. How much, and which kind, depends on the design you choose and the money you have.
This is the order I followed.
-
I got hold of some magnets. I have already written about that in the build story.
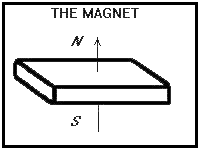
Use a magnet that is anisotropic, magnetized through its largest dimension. Ceramic ferrite or strontium magnets will do. The strontium ones are stronger, and they can sit closer together without disturbing each other’s field as much.
The Danish project used 102 magnets for the woofer, 42 mm by 7.7 mm by 9 mm (length, width, thickness), and 60 magnets for the tweeter, 50 mm by 19 mm by 5 mm. Double that for a pair. Magnets are cheaper in quantity, so you can buy them with other builders.
-
I started with household material: kitchen plastic foil, chocolate paper as the conductor, and cardboard as a frame. Later the frame became wood, and the membranes got bigger.
-
Once the principle worked, I started gathering material for the full-scale prototype.
-
Find the best place to buy the wood. If they can cut the pieces while you are there, better. If they can also make the inner cuts, better still. Get a piece cut for a temporary foot. In my case that foot became the permanent base.
This is where you make the first real decision. One solid frame, or several thinner plates stuck together? Wood alone, or wood mixed with something stronger?
-
Decide whether you want to paint the frame. I did not paint the prototype.
-
Look for the perforated iron plate and decide the thickness. That depends on whether you can cut it, what it costs, and what you want from the sound. Aim for a plate with plenty of holes, at least 50 percent open area, or the speaker gets even less efficient.
-
Find a place that can cut the plate to your sizes. Remember the plate has to match the holes in the wood. Better still, cut the plate to your sizes first, then cut the wood to match. Better again, let the wood thickness follow the magnets so the iron plate screws straight onto the frame. Then the plate only needs to be a little smaller than the MDF.
Cut the woofer hole from the membrane you will use, in these proportions:
4 : 3 : 13
That gives a trapezium. It helps the vibrations travel and reduces standing waves on the membrane.
How large those dimensions are depends on your MDF width, your magnet thickness, and the rest of the design. My magnets were not very wide, the MDF was very thick, and their field was weak, so I put them 2 mm from the membrane. That meant the perforated plate had to be cut to fit the woofer hole.
The original Danish design used a thin plate and stronger, thicker magnets, so the perforated plate could screw straight to the back of the MDF. Easier, faster, and less precision.
-
Find the membrane material: a strong, thin, resistant plastic that does not stretch and is not upset by humidity. I recommend Mylar. If you find something else, tell me.
-
Find the foil. The chocolate-foil paper was hard to find in Chile. I will not tell you where I found it. You will have an easier time. In Denmark it is sold in the supermarket. A paper store is another place to ask.
-
Experiment with the foil until you know its resistance. Then you can work out the length you need for the 3 to 4 ohm circuit the membrane should have. I will come back to that.
-
The glue I used is a 3M product. Where you live there may be competitors. In Chile, at that moment, it was my only option. Practice with it: how effective it is, how much to use, and the wrist movement.
-
Get the aluminium L-profiles. They hold the metal plate, and the magnets on it, close to the membrane.
If you choose 30 mm MDF, as I did, the magnets have to sit closer than those 30 mm. I wanted them 2 mm from the membrane, so the plate sat about 20 mm into the board. The L-profiles hold that distance. They are also what you use to stretch the membrane.