
The Ribbon Speaker Membranes
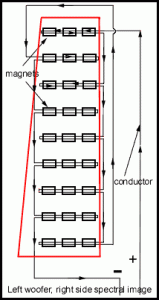
This is the crucial part of the project: the “bass” membrane and the “tweeter” membrane. I put those words in quotation marks because they are not really separate. The crossover is at 1000 Hz, or is it 500 Hz, and the slope is very gentle, so the two overlap a great deal.
Why this part takes the time
As the project is designed, the membrane takes the most time. At the end I will mention ways that time might be shortened. It is also the part that asks for the most care, patience, and skill. Those show up while you are building. You do not need to arrive with them.
Three layers
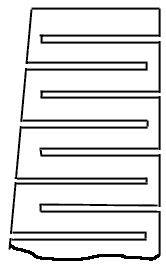
The membrane has three parts: aluminium foil, a plastic support, and the glue that holds them together.
In the original project the plastic was an oven bag of polyester, slit along the edges. That gave a strong film that barely stretches, at a very low cost. The drawbacks were the limited size, the crease down the middle (sometimes with an actual cut in it), the thickness of the film, and the fact that some oven bags hate humidity. To my horror.
I chose Mylar film. I could not find it in Chile. I happened to be in Buenos Aires, and I bought it in the most unlikely shop: 12 micrometers thick, 1 meter wide, 15 meters long. Enough for a lot of loudspeakers.
Some builders do not worry about the weight of the membrane. Their argument is that the air the membrane moves weighs so much that a few extra grams on the film will not matter. I cannot prove them wrong, and I cannot prove them right. I chose the lighter, thinner materials. They give a flexible membrane that does not rattle. Rattle shows up when both the aluminium and the polyester are thick.
After I ripped the second membrane I was making, not my finest hour, I had to find more film for the first full-size prototype. What I found may help anyone who cannot get Mylar sheet: stickers. In Chile, at least, stickers are mostly Mylar with adhesive already on the back.
They sold the sticker stock in 1 by 1 meter sheets, just the right size for this membrane. Then you do not have to stick the aluminium on yourself. The Mylar already has adhesive.
Glue
The original project used aluminium foil made for window alarm tape, 30 micrometers wide, with glue already on the back.
In my design I had to stick the foil onto the Mylar, as some other designs do. I recommend 3M Super 77 spray adhesive. It leaves a thin layer that is strong and lasts. Other glues can work if you dilute them enough to spread them thin.
The foil
Some people cut long bands of ordinary aluminium foil. I took an easier route: a paper with a thin aluminium foil on waxed paper. In Chile it is used to pack chocolates. I do not know if that is universal. Heat it, the wax melts, and the foil comes off the paper. You can leave a very thin foil, about 12 micrometers, on the polyester and throw away the heavy paper.
How to cut the conductors
That two-layer sheet is easier to cut. You cut the design in the foil and not through the paper, so the paper holds the design together.
You have to leave a 1 mm gap between conductors. That sounds impossible until you make a double-bladed knife. In Chile we call them cardboard knives: wide, sharp, easy to hold. Put two together with a coin, or anything about 1 mm thick, between them. Tape them, and cut. Carefully, but deep enough to go through the foil. Then pull off the thin 1 mm strip of aluminium from the waxed paper. Go slowly. If the foil is not fully cut, you can pull a piece of the conductor away with it.
In my opinion, this is the easiest way.
Specs
- Membrane: Mylar film, 12 micrometers (0.012 mm)
- Aluminium foil: about 12 micrometers (0.012 mm)
- Total thickness of the two layers: 0.024 mm
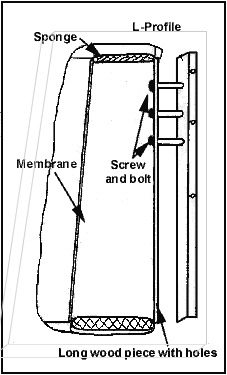
- The membrane is not corrugated. It is stretched as it is.